
A Touch of Brass A Bit of Whimsey
Improving the Life Like Model References
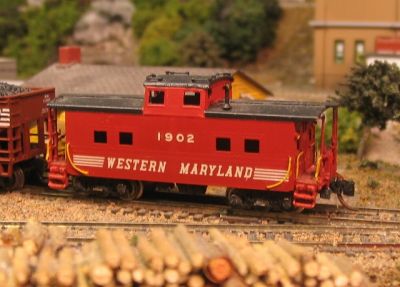
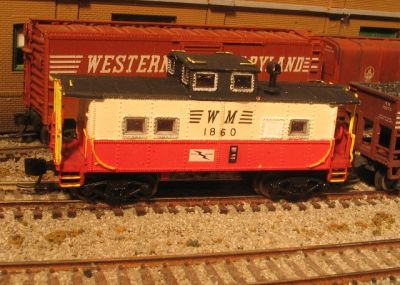
The Life Like Northeast Steel Caboose is dead on for the model employed by the Western Maryland from the mid 1930's to the end of independent operation. Before it was introduced in the early 1990's, WM modelers had to rely on brass models or home-made kit bashes.
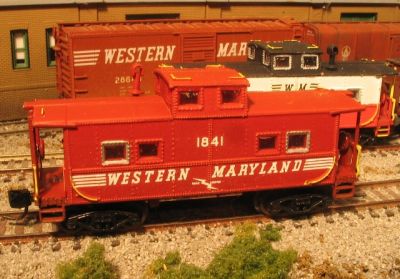
The stock Life Like caboose was released in the Speedlettering scheme, but it was not entirely accurate. I generally model by the "3 feet away" rule, but the Life Like model fails on two counts. The color is too dark to properly resemble Oxide Red, and the roof is painted black. Well, that's not exactly wrong, but it is wrong for my era. WM cabooses retained the black roof paint from the steam era, but only into the very early '60's.
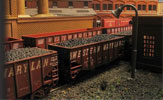
I've built up a pretty good sized fleet of WM cabooses, most of which start out looking like this...

But thanks to the miracle of spray paint, this is easily remedied! The only other commercially available WM caboose is a Bev Bel/Life Like car with the Circus scheme. This car is nicely done, which is unusual for Bev Bel. Micro Scale makes a decal set that includes all three "real" WM schemes, including the round herald in two sizes. It also includes the scheme with the silly cat, but you can throw that part away, or use it to deface photographs of your enemies.

I use good ole' Oxide Red primer from my favorite Arkansas-based global mega retailer. For 97 cents, I get enough paint to do 10,000 cars. Compared to published photos of freshly painted WM cabooses, I'm satisfied with the color. During the 1960's, cabooses were painted Oxide Red, including the roof.

Before I add the decals, I carefully brush paint the yellow highlights on the grab irons, ladders, and the ends of the roof walks. I use craft acrylic paint and a fine brush for this. After the decals are applied, I seal the whole thing with Testor's Dullcote. I also use a silver colored Sharpie marker to highlight the window frames to represent the aluminum windows that were installed in many of the WM cabooses during the late '60's and early '70's to comply with new safety regulations. I'm looking for materials that I can use to represent the mesh screens that were also used to protect the glass from projectiles. (The WM went through some of the rougher neighborhoods of West Baltimore...)
This is my one piece of brass rolling stock. I purchased it a number of years ago, before the Life Like model became available. At $50 a pop, I was sure glad to see this caboose come out in plastic.
The model is by Hallmark, and was painted and lettered for me by Jim Cushon.
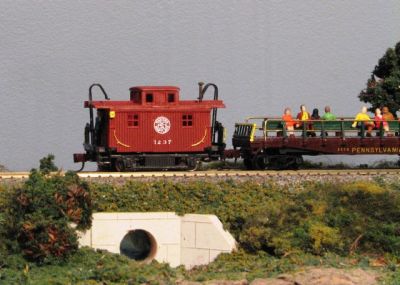
When I bought my Atlas Shay, I figured a good way to justify having it on a 1970-era layout was to have a tourist train for it to pull, similar to the operation at Cass, West Virginia. I have a pair of the Roundhouse 35' Overton passenger cars, and a flat car that I converted into a tourist car with railings and a bench down the middle. A good way to punctuate the tourist trapper would be with a small caboose. I had a Bachmann 4-wheel bobber floating around the junk box for years, but I never liked the western look of it, with the extra windows and the open cupola. Then recently I saw a photo of a bobber that had been kitbashed to correct these problems, and was inspired to try the same.
Prototypically speaking, the car is a bit of a stretch. The WM did roster 4-wheel wood cabooses with cupolas from the late 19th century into the 1920's, but a re-building program during that decade denuded these cabooses of their cupolas. The flat-top bobbers continued in service into the 1930's, when they were replaced with the more modern steel cabooses described above. My caboose was going to serve a fraudulent purpose, so I'm perfectly at ease having a fraudulent caboose!
I started by cutting the 1/4" section including the middle window from each side and filling it in with Evergreen v-groove siding. I blocked it from the interior side with some scraps of styrene, being carful not to block the area that's occupied by the caboose floor. I used a strip of thin styrene to put a trim board above the windows to mask the cuts at the roof line.
Improving the Life Like NE Caboose
As welcome as it was, the Life Like Northeast Steel Caboose is now a relatively old model, and can use some tweeking to fit in alongside some of the newer caboose models available. I make a few modifications to help bring their appearance up to speed.
First, the stock wheelsets have to go. Out of the box, the original wheelsets have oversize flanges, making them unsuitable for newer code 55 track. They also look like Pizza Cutters. Previously, I had replaced the trucks entirely with Micro Trains trucks with attached couplers. This isn't a perfect fix, though, as the truck, mounted draft gear hits parts of the shell unless modifications are made. To make these work, I would trim the tabs that hold the shell to the frame, and apply a dab of glue to hold the car together. Also, the short extension MT truck barely clears the end platform, and a medium extension truck goes out too far. The short one works, but you have to use the shim washers to raise up the car body to clear the coupler. This results in a car that sits too high.
More recently, I've begun installing body mounted 1015 couplers, which eliminates the need for the washer. I also go back to using the stock truck, but I clip off the Rapido coupler, and replace the wheelsets. It turns out that the Atlas replacement wheelsets for MT trucks also fit nicely into the LL stock truck, so this is an easy fix.
In addition to eliminating the shim washer, I can also file down the bolster to allow the car to sit a little bit lower, giving it a much more prototypical appearance.
References
Many WM cabooses survived in Chessie paint well into the 1990's, and there are dozens preserved at various historic sites, private homes, and even in short line rail service. Dwight Jones' definitive work "Western Maryland Cabooses" (Published by the WMRHS) served as my primary resource for modeling my fleet. I also used Jack Brown's "Color Guide to Western Maryland Equipment" published by Morning Sun Books.
Prototype Photos:
Paint Schemes for WM Cabooses
Photos By Lee Weldon
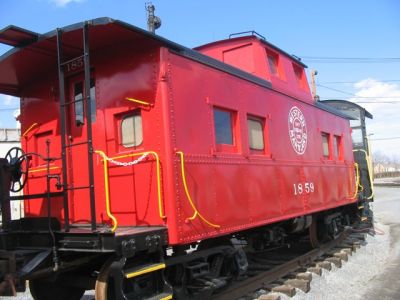
Fast Freight with a 36" Herald. Caboose Red with Roman numbers. The cars did not have end windows originally. These were added during the diesel era. This example is located at the Hagerstown Round House Museum, Hagerstown, Maryland. Note the different shades of red in the photos above and below.

Speedlettering. This handsome scheme was introduced in 1954-55. The details of the lettering changed a little over the years, including the addition of the lightning bolt "radio equipped" markings in the early '60's. This is also displayed at the Hagerstown Roundhouse Museum.

Caboose 1830 wears the Red White and Black, or in the vernacular, "Circus" paint scheme. This was the last colors worn by WM equipment as an independent operation. There was that other scheme, but we won't talk about that here... 1830 is privately owned, and displayed with several other cabooses in Linthicum, Maryland.
The Circus scheme is a little more complex, involving masks to apply the paint. I start by priming the car, then applying flat white to the whole car. After the paint has thoroughly cured, I mask the top half of the car to paint the red. This is a brighter color than the Oxide Red, and it was a little trickier to find. Not being an air-brusher, I chose "American Barn Red" from a local hardware's selection of spray bombs. I'm satisfied with the color, and also use it for the steam era paint scheme. That sits and cures completely, (I usually give it about 48 hours) then I mask for the roof. Note that the full cupola is black.
.
When the WM converted its caboose heaters to oil, they had a recurring problem of the interior wood sheathing catching fire. So the boys in Hagerstown and Elkins started plating over the window behind the stove and installing an insulated metal skin on the inside wall. I used a bit of styrene. I've also started adding glazing to the caboose fleet using a gloss de'coupage medium. The Hallmark caboose was offered in both steam and diesel era configurations. The major difference is the end windows as shown below. On of these days I'll get around to cutting them into my Life Likes, but it's not a big priority right now.
I then took small bits of the same siding to fill in the gaps of the cupola, leaving two window openings on each of the four sides. I painted it Oxide Red, and applied a round herald and a prototypical number for this type of caboose. Finally, I drilled a hole and stuck in a track nail to provide a smoke jack. Man I'm cheap!!

Next, as noted above, I have begun plating over the appropriate windows behind the stove and at the washroom. This is simply a matter of cutting a small piece of styrene that fits the window opening, and adding a backer inside the shell. The styrene should be fairly thin, and end up flush with the outside wall. Fill in any seams, then paint the plate to match the car side.
The easiest thing to do to improve the appearance is to add the yellow highlights to the ladders and molded on grab-irons. Use a small, flat brush and craft acrylic yellow paint, and apply the paint sparingly to just cover the surface of the molding. The appearance may not be as nice as the free-standing grabs on the brass caboose, but when the 3 feet away rule is applied, they look great.
Finally, to keep up with the newer caboose models, I needed to add glazing to the window openings. The thought of cutting and fitting 16 little sashes per car on almost a dozen cabooses seemed a bit daunting, so I tried using a clear de'coupage glaze purchased from the craft aisle at our favorite Arkansas-based major retailer. Applying the glaze with a flat brush forms a "membrane" across the window opening, which after about 24 hours dries completely clear and glossy, effectivlely putting glass in the windows.
So, without spending a great deal of money, and only a couple of evenings worth of work, I've improved the Life Like caboose to adequately share the rails with the latest caboose offerings from Atlas and others.