The crew of VO 129 prepare to spend another shift bumping cars at the Westvaco Paper Mill in Luke, Maryland.

F-7 235 pauses for orders at MY Tower with an eastbound extra. MY has been "selectively compressed" into midst of the Luke Mill complex.

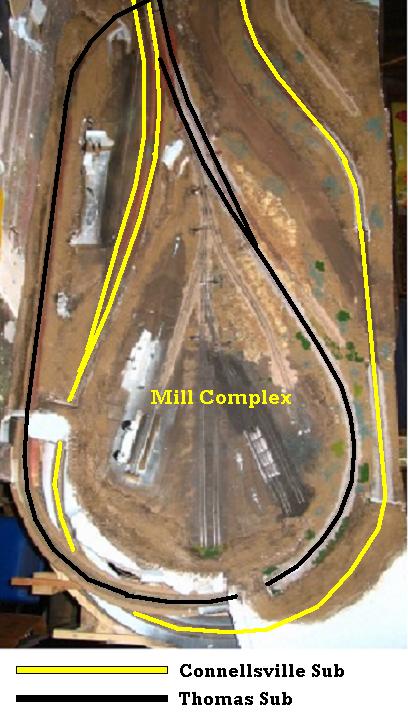
MY Tower stands at the point where the black and yellow lines diverge at the top of the image. The Thomas Sub continues on as a point to point branch ending at Elkins, while the yellow Connellsville line loops around the peninsula and goes to a thru staging yard, enabling continuous running around the entire layout.

The train is broken to pick up a cut of empty hoppers to deliver back to Rockwood Jct.

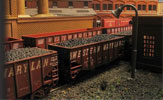
A brakemen signals the engine crew as the couplers get close. The Laurel Valley hoppers are old Trix quads re-painted and lettered with custom dry transfers.

A pair of RS-3's pull an extra through, and leaves behind a cut of woodchips, pulpwood, and coal
Note- The track marked "Bayard Cutoff" is a short connector that provides for continuous running over part of the Thomas Sub for display purposes. It is not used during operation.
Cars for pick up and set out must be held on the two outside sidings, one parallelling the Connellsville Line in red, the other south of the Thomas Sub in blue. The inside track that splits at MY has to remain clear for switching and run-around moves, as well as through trains coming from three directions!

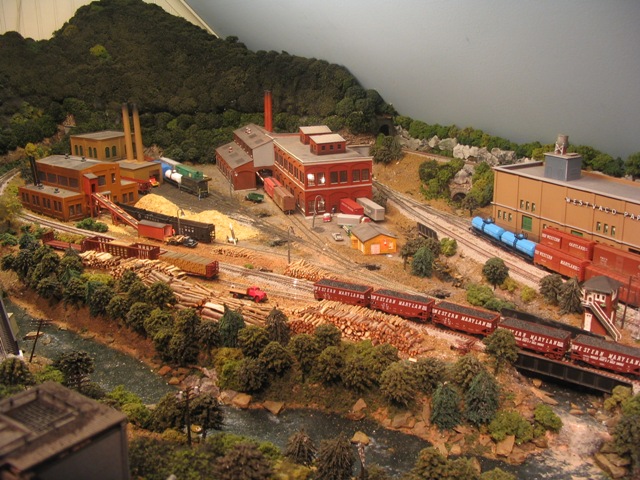
The table is set for the crew of WM-129. The coal hoppers in the foreground will be spotted at the power plant, the blue tanks go to the mill building in the center, and the boxcars will be exchanged for the cars at the warehouse on the far right.
The switch list below shows the present locations of all the cars inbound and outbound at the mill, and where they need to be spotted for loading, unloading, or pick up by the next road freight. I'll be using car cards to back up the switch list, which will be partially prepared for the crew before an operating session, and updated by hand by the switching crew as new cars get set out from the main, and the other cars get spotted.
The outbound cars are highlighted, red cars go to the north siding to be picked up and carried east to the yard at Hagerstown for classification, and blue cars will be picked up by the West Local and carried back to Elkins on the Thomas Sub. All the other cars are bound for spots within the plant complex.
The N&W run-through caboose clears MY Tower, and 129 gets back to work again.
The empty wood chip cars are pulled out of the spur, and the tank car is shoved in, all the way into the processor building, where it will be secured and unloaded. Leaving the empties on the yard lead, 129 again gets clearance from MY, then heads to the east end of the south siding to get the loaded wood chip cars ready to spot. A quick check with the tower reveals that a second section of AJ-2 has just cleared the summit at Deal, and will be along in about an hour. The wood chip cars and the pulpwood cars are pulled from the siding, and before he re-enters the mill yard, he sets the switch to leave the pulp cars on the Thomas Sub Main. There’s not another train expected from the west until nightfall, so this maneuver is safe for the moment.
Finally, the wood chip hoppers are spotted, and the switcher heads back out to the east end of south siding to start shuffling coal. There are seven carloads, but the pier and storage track have room for only six, and three are already spotted on the pier. Some of these cars will have to wait in the yard until its their time to feed the powerful generators.
The Baldwin strains to pull all seven loads back out the east end, the MY operator resets the interlocking, and the hoppers are shoved into the mill yard. The brakemen sets the turnout to send three of the cars into the storage track, and the other four will be spotted in the yard track.
Finally, the switcher heads back out onto the Thomas Sub main, couples to the pulpwood cars and shifts over to the South siding, this time from the west end. The tower radios that a coal extra of empty hoppers is coming in from the east headed to Bayard for distribution to the mines. The crew waits for its arrival, it pulls up to the interlocking at MY, then stops on the westbound track. Moments later, the second section of AJ-2 runs through the interlocking, speeding a piggy back train east to Hagerstown.
After several minutes pass, the westbound extra 234, pulled by a matched A-B set of F-7’s, creeps through the interlocking onto the Thomas Sub, then starts the climb to Fairmont. Once again the Thomas Sub main is clear, and the necessary maneuvers are made to swap the empties from the pulpwood yard with the fresh loads coming in. The empties are spotted on the South siding.
While this is taking place, WM-6 finally makes its appearance, and picks up the cars from the North siding, but not before leaving behind eight more cars for the next shift to work.
Finally, the remaining cars in the yard tracks, the three empty coal hoppers, the empty wood chip cars, and the flat are spotted to be picked up by the West local when it comes through the next morning from Cumberland.
Back to Home
The mill is worked by VO-1000 #129, which stays at the mill property, except for servicing when it is moved to Hagerstown and another locomotive substitutes.
Set outs from Connellsville Sub trains are left on the north siding, while cars from Thomas Sub trains are spotted on the south siding. Maryland Jct. Tower, where the two subdivisions split, is situation in the middle of the mill complex, making this a very busy piece of railroad, with numerous thru movements, as well as locals coming along from three directions to interrupt the work of the mill job. Mainline turnouts on the Connellsville Sub are controlled from MY Tower, and Thomas sub switches are manually thrown.
The sidings that serve the mill are located both inside and outside Maryland Jct, requiring several movements that cross the mains. Clearance has to be obtained by the engineer from the tower operator. (Usually the same guy…)
If you’re familiar with the Western Maryland, you’ll notice that Maryland Junction is about 20 miles out of place, and that the yards at Cumberland are missing completely. I wanted to include the through traffic of fast freight Alpha Jets, as well as a significant amount of coal operations. This meant including both the Thomas Sub to West Virginia’s coal fields as well as the main line to Connellsville, Pennsylvania, where the WM interchanged through trains with the P&LE and N&W. This meant Maryland Jct., where the prototype lines diverged, would have to be somewhere.
Since my space is relatively limited, (approx. 16’ x 16’) I split the line at a location that is close to the return loops that turn both lines back toward the main body of the layout. Since there would, by necessity, be a lot of track in this area, I decided that a large complex like a paper mill would do well to fill up the space and disguise the otherwise crowded track plan. Some planning went into the scenic treatment of the area to add to the camouflage.
There isn’t enough room for a functioning yard as at the prototype location, and I’ll have a large class yard at Hagerstown on the other side of the room, so the compromise seems to work. Trains from the Thomas Sub will simply proceed east to Hagerstown for sorting and forwarding.
The construction of this section of the layout was a challenge, since I not only had a switching area grades and a pair of return loops, I also needed enough vertical clearance to account for a river below the lowest tracks, and a hidden staging yard with a one-lix loop over it! I started with a basic L girder frame, and built the staging yard first. I used up some left-over Atlas code 80 flex track, mounted on cork roadbed that is glued to ˝” sanded plywood. All of the turnouts are within easy reach of the aisle, but I still wanted them to be as bullet proof as possible, so I chose Peco’s switches and switch machines. There are a total of eight through tracks, 4 in each direction.
Once I was satisfied with the climb out of the yard, the trackwork and the electrical connections, I added a frame of 1x1 stock and Ľ” luaun plywood. A layer of ľ” extruded blue foam is laminated to the plywood for the final application of track and scenery. I allowed for plenty of clearance in the hidden staging yard so I could easily get to any wayward cars down there. My basic philosophy toward hidden trackage is to build for the best, but plan for the worst. In other words, take extra care when laying your track, and always provide for access when you need to send in the 0-5-0 switcher.
The upper level is where the action is. Let’s follow BT-1, a through train from Baltimore to Pittsburgh, as it prepares to set out some cars at Luke before heading up to Pennsylvania.
The train arrives at mid-day, slowing to a stop at MY Tower.
The conductor checks his notes, and he has five cars to drop off on the siding, including two tanks full of chemicals, two empty boxcars for loading, and a gondola carrying machine parts for the mill. He also sees a cut of empty Laurel Valley coal hoppers that need to be picked up and hauled back to Rockwood Jct., where the WM has trackage rights over the B&O’s Johnstown Branch into Somerset, PA.
A brakeman swings down from the lead BL-2 and bends the iron to make the moves, and after the air is checked, the train rumbles off to the west, leaving behind the evening’s work for the mill switcher.
The engineer of the aging VO-1000 switcher approaches his trusty steed, and gets ready to start the day’s work. He goes over the switch list with his conductor while the old Baldwin burbles on a yard track, and once satisfied that he knows what moves to make first, he calls the operator at MY Tower to ask for clearance to go out on the main.
The switching is almost constant at the plant, on some days a second engine is conscripted from the engine terminal at Maryland Jct.
There’s a two track storage yard between the main paper mill and the coal fired power plant. Cars in this small yard are either empties ready to be returned to the main sidings for pick-up, or inbound cars that need to be spotted. Today, the cars are mixed up, and will need to be sorted to keep things moving efficiently. While BT-1 was switching on the main, 129’s crew starts shifting the cars in the yard into cuts that are going to similar destinations. There are two inbound empties that need to be moved across the Connellsville Sub track to the paper warehouse, three empty LRV coal hoppers bound for the north siding, a flat that will go to the south siding, and a boxcar full of packaged Kaolin that needs to be spotted on the mill track.
The switcher couples to the outbound cut, checks the air, then slowly growls toward the mill’s switch lead. With clearance from the tower, the train eases out onto the main, crosses over to the north siding, and exchanges the outbound cars for those recently set out. While the switching is underway, the tower radios in that 129 is to hold on the north siding, to allow an eastbound coal extra to come off of the Thomas sub.
The extra includes a cut of wood chip hoppers and several bulkhead flatcars loaded with pulpwood. Six hoppers of coal are also bound for the mill. Two empty bulkheads will be picked up from the south siding and carried back to the yard by the extra as well.
After about 20 minutes pass, a headlight comes into view up on the mountain, and Extra 196 pulls to a stop amid a cloud of brake shoe smoke. The wood chip cars are located at the front of the train, following the company’s policy to keep coal dust from contaminating the chips. The cars for the mill are cut from the consist, and exchanged for the empties on the south siding. Once the train is reassembled, a brakeman walks the length of the train, climbs up to the caboose, and radios the head end that the train is ready to head east to the yard.
Once the caboose clears the tower, the engineer in 129 is ready to get back to work. This now includes spotting the 10 cars set out by Extra 196.
He’ll have to work quickly, because it won’t be long before AJ-2, one of the fast Alpha Jet freights, is due to pass MY Tower on its way to Hagerstown.
The first order of business is to pull the empties from the mill, and the loads from the warehouse. Some of these cars are due to be picked up by WM-6, which will be fast on the heels of AJ-2.
Here’s the track chart of the mill:

After the cars in the yard were shuffled, the LRV hoppers and the boxcars headed to the warehouse have already crossed the main, and will be exchanged with the cars set out earlier by BT-1. The warehouse track will also be cleared, and the two empties spotted at doors 1 and 2. The warehouse doors are spaced to accommodate 40’ boxcars. This is accomplished, and the inbound cut of cars is switched back across the main, and shoved back into the yard track.
The next track to be cleared is Yard Track 2, which is closer to the power plant. The remaining cars there are destined for the Mill track and the south siding. The PC box, loaded with packaged Kaolin clay, and the WM flat are pulled from the yard. The cars are then switched so the PC box and the two blue GATX tanks can be spotted on the Mill track. The Mill track enters the building, where the Kaolin will be unloaded protected from the weather, while the tanks remain outside the building. The WM gondola loaded with machinery will be held in the yard track until it’s needed inside the mill.
The cars pulled from the mill are then moved over to the north siding, again after receiving clearance from the tower operator, who must align the interlocking. AJ-2 is still 25 minutes away, so there’s plenty of time to spot the cars for the eastbound pull and get back into the plant yard.
All the remaining moves are on the south side of the main, so the crew can work while the main remains clear for the Alpha Jet. The crew will need to clear one of the yard tracks, and pull the chemical tanker out so it can be switched into the pulp processor building.
The next thing to do is to switch the empty coal hoppers out of the coal pier, which loads the bunkers of the power plant. They will be replaced with the three loaded hoppers waiting on the storage track next to the pier. The empties are shoved into the yard track., and the chemical car is pulled back to the spur that serves the pulp processor. In the distance, the horns on AJ-2 can be heard sounding for a grade crossing.
129’s crew will have to wait until AJ-2 passes, because the next move requires them to pull out past the switch at MY, which would foul the main. With the Alpha Jet’s high horsepower locomotives and fast schedule, they won’t have to wait long.

A chip car, rebuilt from an old coal hopper, is spotted at the chip unloader. These will be boiled down to fibers then pumped over to the paper mill for final processing.

The coal fired power plant at the mill generates steam and electricity to run the paper making process.

The final spots are made for the night, but it won't be long before more raw materials are coming in, and more finished paper needs to be shipped out.
